Photo by Dmytro Varavin on iStock
This project stems from my desire to reconcile two of my core interests: data science and finance. Designed to be fully reproducible, it’s ideal for those seeking practical, hands-on experience in data engineering. Each decision in this project was guided by a trade-off between enhancing security and controlling costs, while strictly adhering to the principle of least privilege.
1. Context
At the start of a customer relationship, banks gather personal data to verify the customer’s identity through Know Your Customer (KYC) procedures. These records form the basis for monitoring future transactions. Financial institutions use automated software to monitor transactions in real-time, flagging those that exceed predefined thresholds or show unusual patterns. Suspicious Activity Reports (SARs) are generated if a transaction is deemed questionable.
Anti-Money Laundering (AML) regulations require institutions to keep records of transactions for a minimum period. This includes details of transactions, customer profiles, and the SARs filed. When a transaction or series of transactions trigger suspicion (such as structuring, large cash deposits, or transfers to high-risk countries), institutions are required to file SARs with regulators. These reports often include transaction details, customer information, and reasons for suspicion.
2. Scenario
A financial institution processes thousands of transactions daily. To ensure regulatory compliance, the company must periodically review its AML systems and transaction records. Regulators may conduct audits to ensure that the organization is effectively tracking and reporting suspicious transactions. To mitigate non-compliance risk, the institution wants to strengthen its governance by periodically querying AML transaction data without straining the primary transactional database, which runs on Amazon Aurora MySQL.
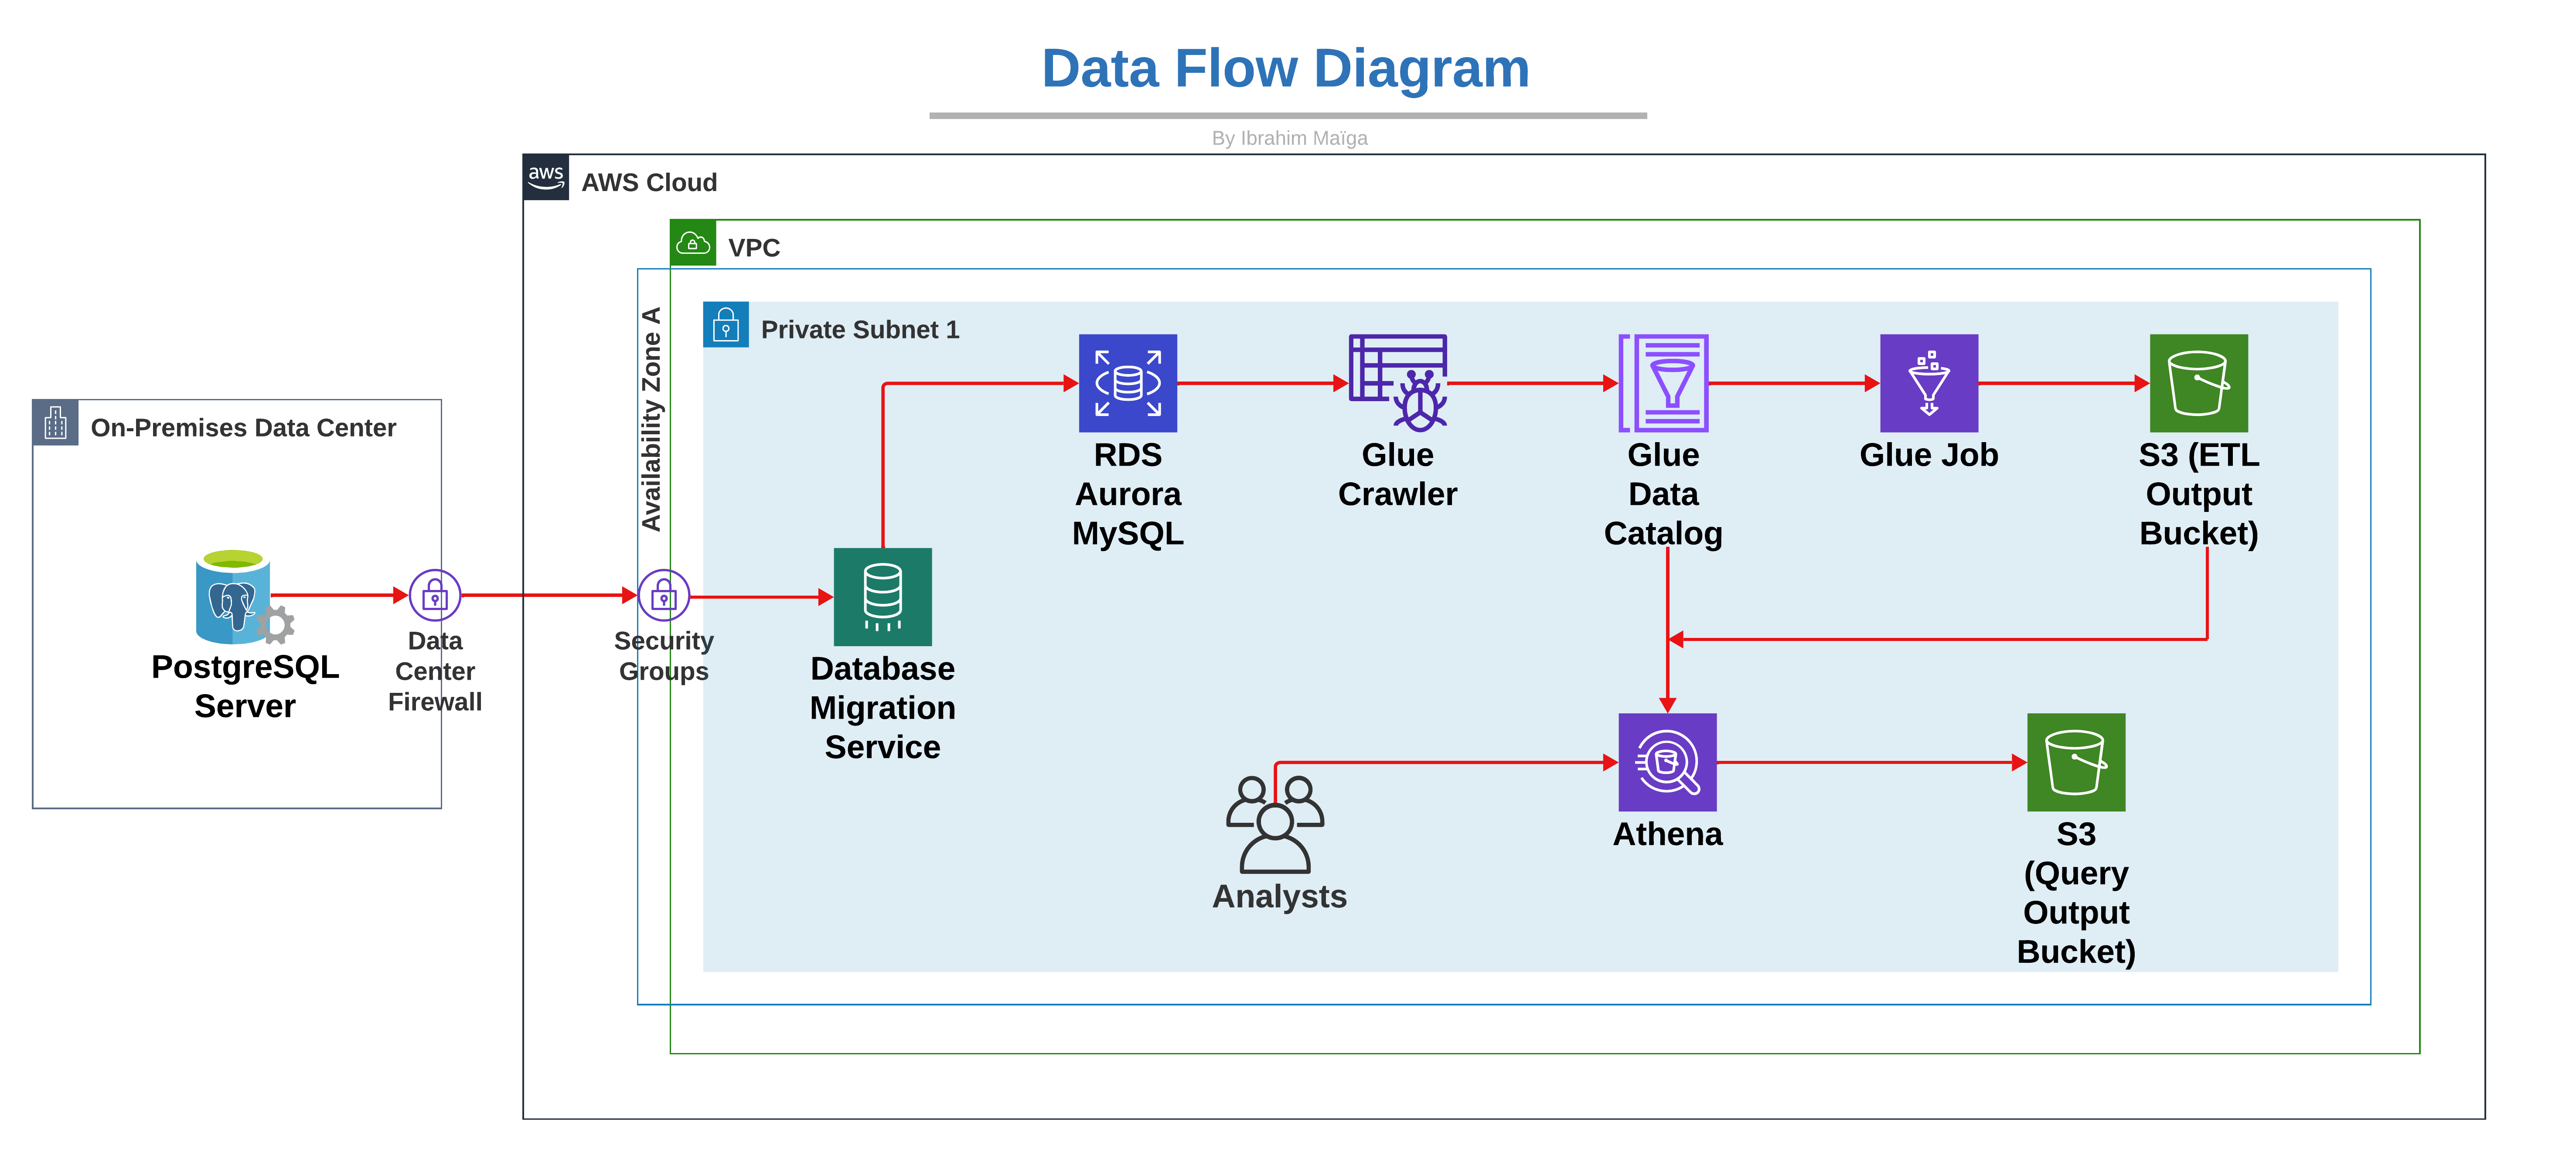
As the company’s data engineer, I will design and implement an ETL pipeline using AWS Glue to extract, transform, and load data from Aurora MySQL into an Amazon S3 bucket designated as the ETL-output-bucket. A second S3 bucket will be set up to store query results. Finally, I’ll test the system using Amazon Athena to query the data stored in the ETL-output-bucket, ensuring AML analysts have seamless access to transaction data, enhancing the AML monitoring framework.
3. Financial Cost
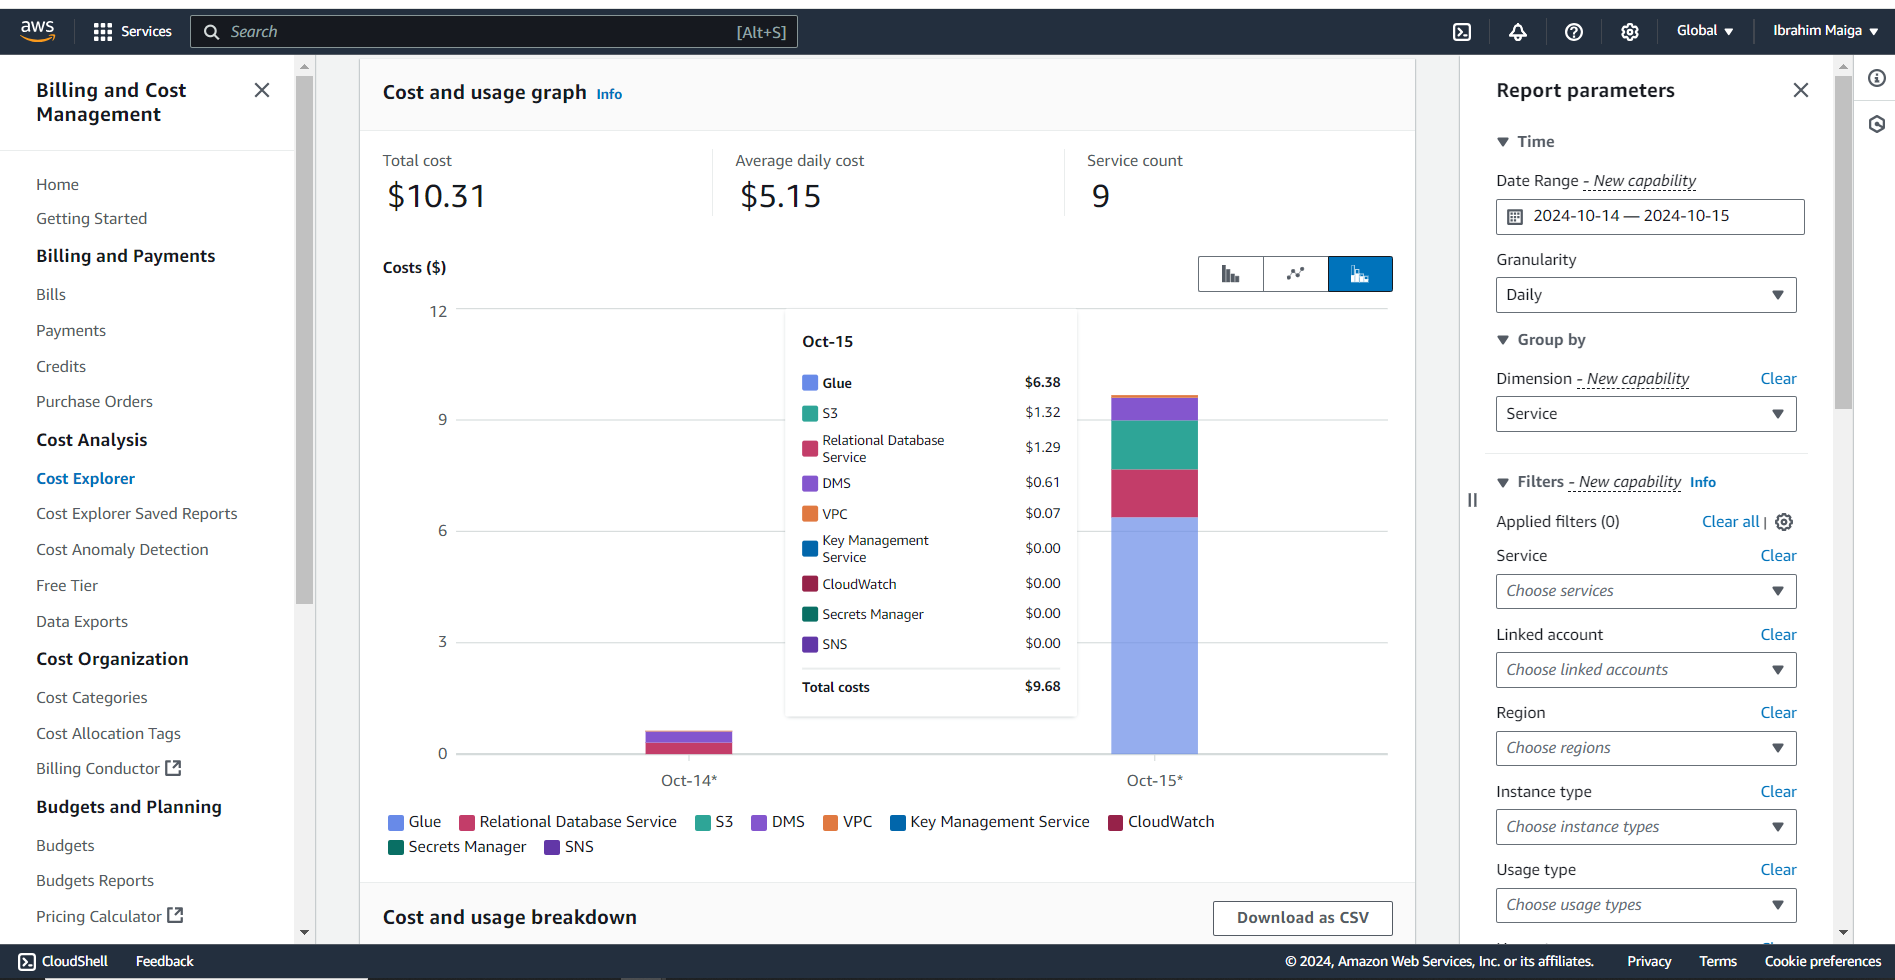
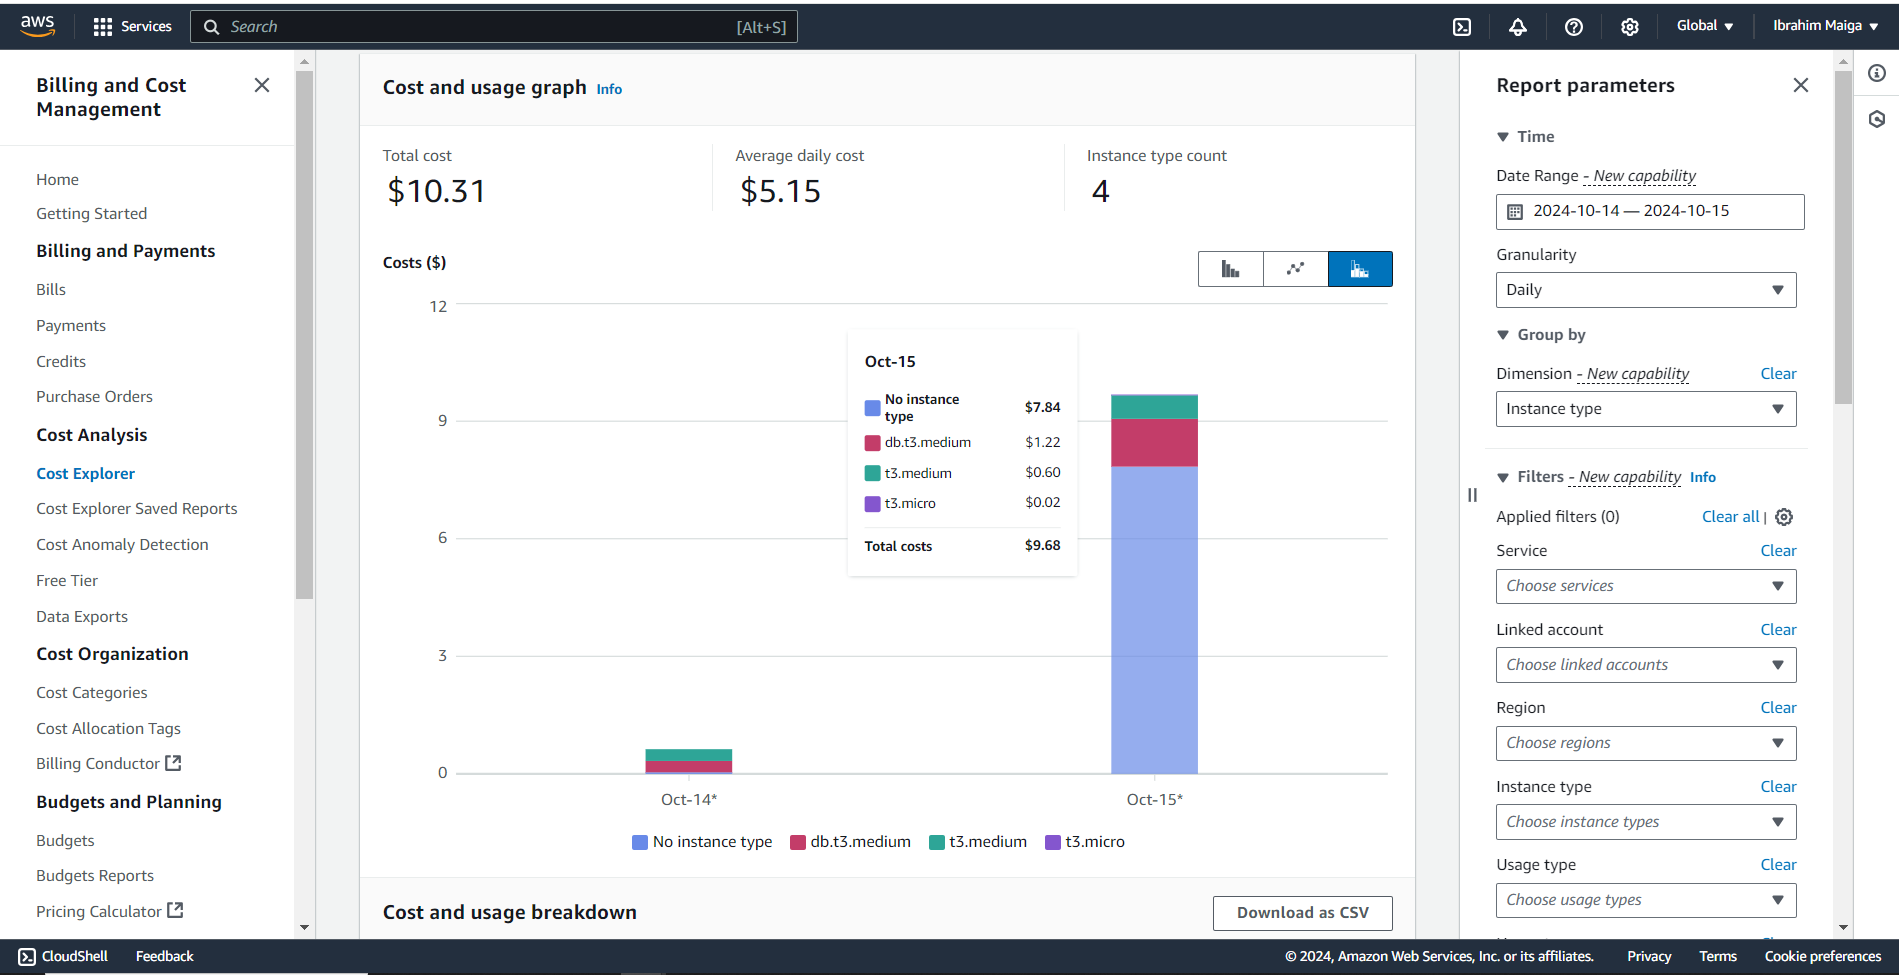
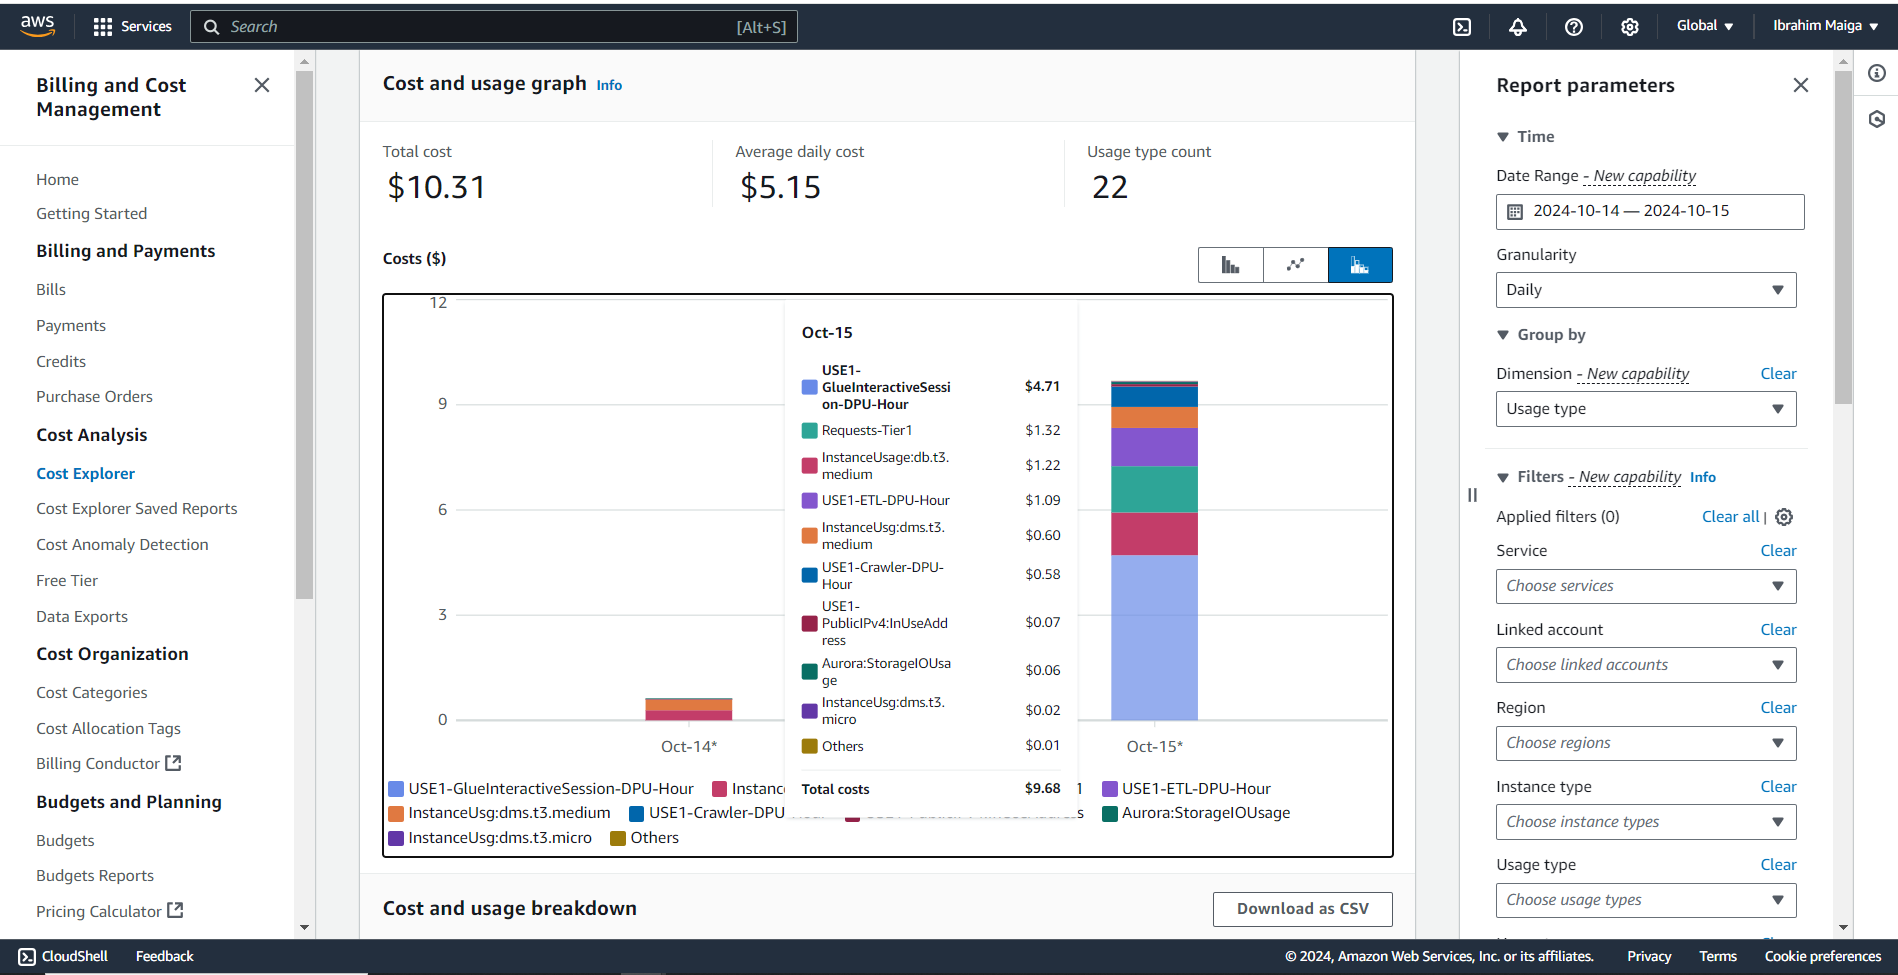
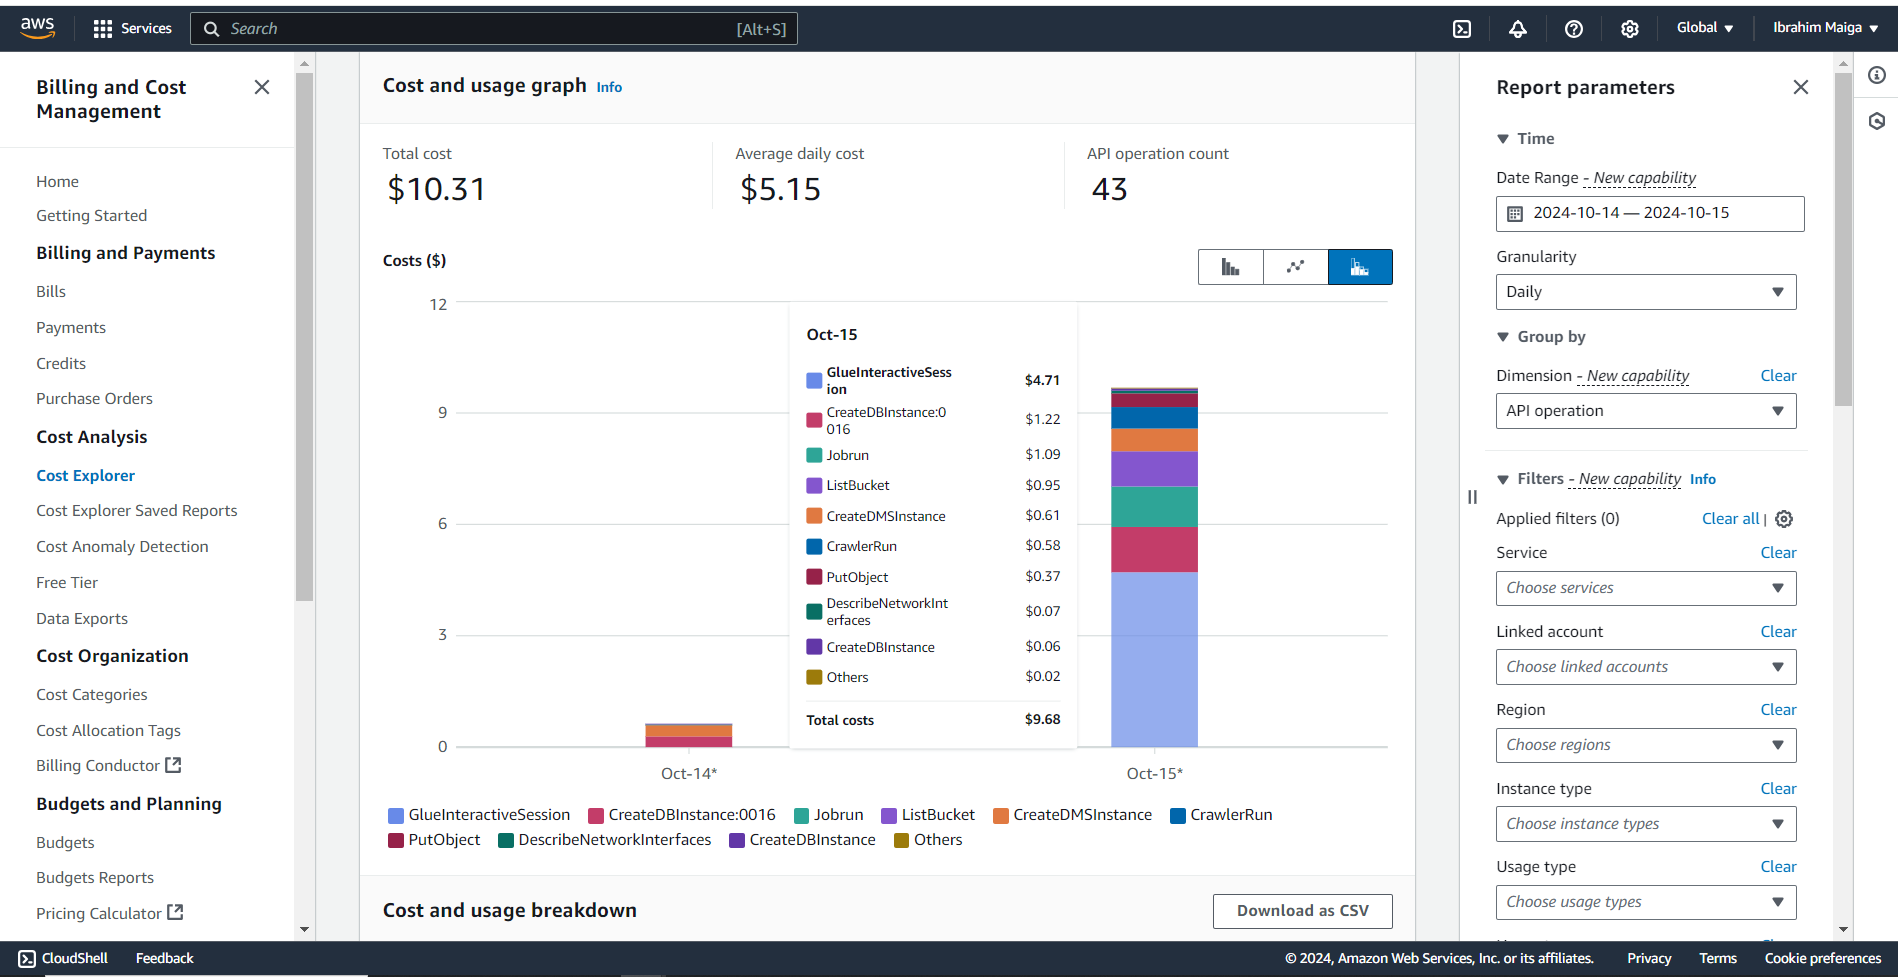
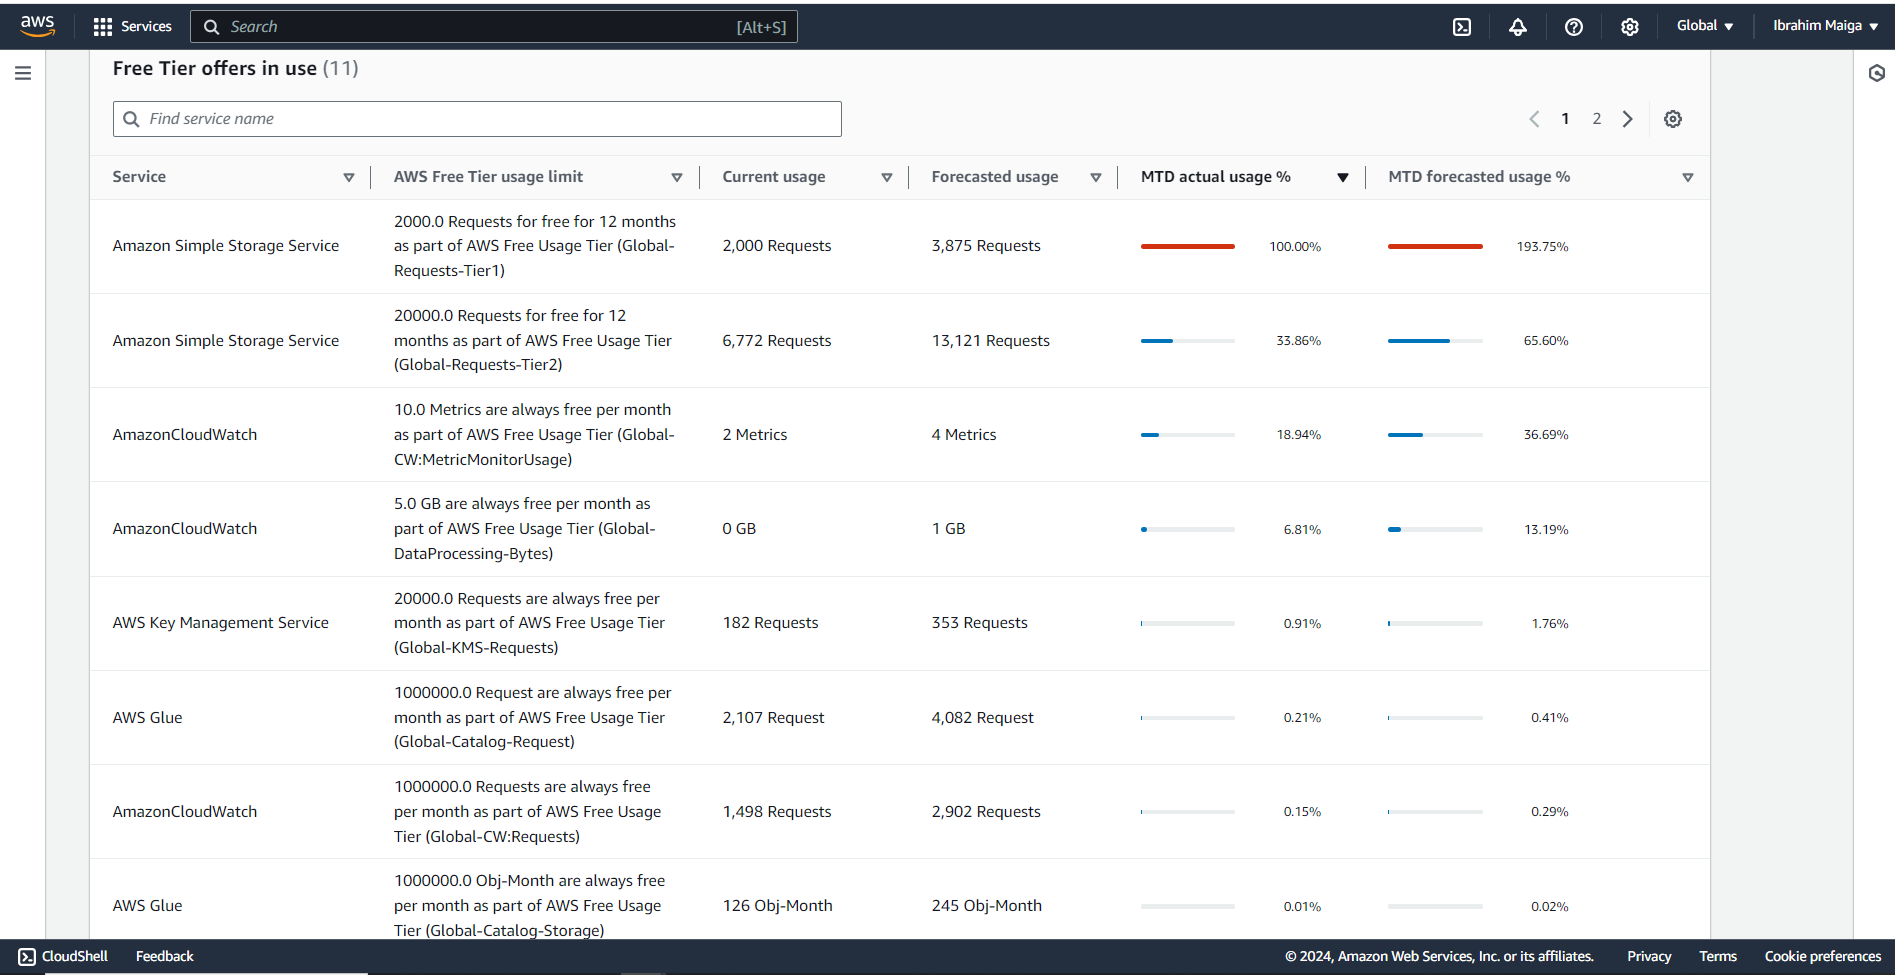
The total cost of this project was just over 10 USD, primarily due to an initial misconfiguration of partition settings in the Glue job. This led to the unintended creation of thousands of small tables during its first run, consuming substantial compute resources and occupying over 300 MB in the ETL-output-bucket. However, I eventually identified the issue, halted the Glue job, and corrected the partitioning error. Following my detailed guide carefully and completing the project in a single attempt could potentially bring costs down to around half of this amount.
Here is some additional information regarding the project’s cost:
4. Prerequisites
Before running the pipeline, we need data² in the transactional database. While multiple methods can be used to load data into it, I chose to incorporate a database migration phase to add depth to the project. This process involves configuring an on-premises PostgreSQL server, creating a database on it, and storing the AML transaction data locally. We’ll then use AWS Database Migration Service (DMS) to transfer the database from our local PostgreSQL server to an Aurora MySQL cluster in the cloud, setting the stage for ETL operations.
It should be noted that AWS DMS is currently incompatible with PostgreSQL versions 16 and 17. Therefore, I opted for PostgreSQL version 15, ensuring full compatibility with DMS and a smooth migration process.
5. Step-by-Step Guide
Step 1: Setup Your Postgres Database
First, install PostgreSQL version 15 on your local machine (which creates a server by default), and then you can manage the server settings and databases using the pgAdmin tool or by executing SQL commands through psql. While I executed the project using PowerShell on a Windows device, the following commands can easily be adapted for use in any command-line interface (CLI).
To connect to your PostgreSQL instance using the psql command-line tool, from the Windows Command Prompt or PowerShell, execute the following command:
& "C:\Program Files\PostgreSQL\15\bin\psql.exe" -U postgres
During the PostgreSQL installation, you defined a password for the postgres superuser account. Enter this password after executing the previous command and press Enter to launch psql.
\l -- List all the databases that are available in the PostgreSQL server
create database aml_transactions_db;
\c aml_transactions_db; -- Connect to aml_transactions_db database
create table aml_transactions (
    Time TIME,
    Date DATE,
    Sender_account VARCHAR(10),
    Receiver_account VARCHAR(10),
    Amount DECIMAL(10,2),
    Payment_currency VARCHAR(10),
    Received_currency VARCHAR(10),
    Sender_bank_location VARCHAR(15),
    Receiver_bank_location VARCHAR(15),
    Payment_type VARCHAR(15),
    Is_laundering BOOLEAN,
    Laundering_type VARCHAR(25),
    Sender_dob DATE,
    Receiver_dob DATE
);
\copy aml_transactions(Time, Date, Sender_account, Receiver_account, Amount, Payment_currency, Received_currency, Sender_bank_location, Receiver_bank_location, Payment_type, Is_laundering, Laundering_type, Sender_dob, Receiver_dob) FROM 'path/to/sample_AML.csv' DELIMITER ',' CSV HEADER; -- Insert data from the sample_AML.csv file into the aml_transactions table in your aml_transactions_db database
select * from aml_transactions limit 5; -- Show 5 first rows within the aml_transactions table
ALTER TABLE aml_transactions
ALTER COLUMN Is_laundering TYPE integer USING CASE
    WHEN Is_laundering THEN 1
    ELSE 0
END;             -- Change the column type from boolean to integer
select * from aml_transactions limit 5; -- Check the changes
Note: Since your PostgreSQL server is hosted locally (on your machine) and you’re connecting remotely from AWS DMS, you may need to configure port forwarding on your router to forward traffic on port 5432 (PostgreSQL default port) to your machine’s local IP address.
- You can find your local IP address and your router’s IP address by typing the following command in PowerShell or Windows Command Prompt (CMD):
ipconfig
Look for the section under your active network connection (Wi-Fi or Ethernet), and find your IPv4 Address (this is the local IP address of the machine where PostgreSQL is running). You will also see your Default Gateway (router’s IP address).
- To connect from outside your local network, you’ll need your public IP address. To find it, open a browser and go to a site like whatismyip.com or just search for “What is my IP” in Google. It will show your public IP address.
With the above information, you’re ready to set up port forwarding.
🛠️ Guide to Configure Port Forwarding for PostgreSQL 🛠️
1. 🔑 Access Your Router’s Admin Panel.
- Open your web browser and enter your router’s IP address (Default Gateway) in the address bar.
- Enter your router’s admin username and password to log in. If you don’t know them, they are often printed on the router or available in its manual.
2. 📡 Locate the Port Forwarding Section.
This section is usually found under settings like: Advanced Settings, Firewall, Virtual Server, NAT, or Port Forwarding.
3. ➕ Create a New Port Forwarding Rule.
Add a new rule to forward external traffic to your PostgreSQL server:
- Service/Port Name: You can name it something like PostgreSQL.
- External Port/Start-End Port: Set the external port to 5432. This is the port that will be open to the internet.
- Internal IP Address: Enter the local IP address of the machine running PostgreSQL.
- Internal Port: Set this to 5432 (the default port PostgreSQL listens on).
- Protocol: Select TCP (PostgreSQL uses TCP for communication).
- Enable the Rule: Make sure to check the box to enable the rule.
4. 💾 Apply and Save Changes.
Some routers may require a restart to apply the settings, so restart your router if prompted.
5. 🔧 Ensure PostgreSQL is Configured to Allow Remote Connections.
On your machine running PostgreSQL, you need to ensure PostgreSQL is set up to allow connections from external IPs:
- Open the
postgresql.conffile in the PostgreSQL data directory (e.g., C:\Program Files\PostgreSQL\17\data\postgresql.conf) or type the following command in your CLI:notepad "C:\Program Files\PostgreSQL\15\data\postgresql.conf" - Find the line that says
listen_addresses, and ensure it’s set to allow remote connections:listen_addresses = ‘*’. This tells PostgreSQL to listen on all available IP addresses. - Save the file.
6. 🔒 Configure pg_hba.conf for Remote Connections.
You also need to update the pg_hba.conf file to allow connections from external IPs:
- Open the
pg_hba.conffile located in the same data directory (e.g., C:\Program Files\PostgreSQL\15\data\pg_hba.conf) or type the following command in your CLI:notepad "C:\Program Files\PostgreSQL\15\data\pg_hba.conf" - Add the following line to allow remote connections (replace 0.0.0.0/0 with the public IP address of your DMS replication instance to comply with the principle of least privilege):
host all all 0.0.0.0/0 md5 - Save the file and restart the PostgreSQL service to apply the changes.
Step 2: Set Up Amazon RDS Aurora MySQL
Here is a comprehensive guide for setting up Amazon RDS with Aurora MySQL:
Step 3: Configure Security Group and Create VPC Endpoint for S3
You can use this guide to configure the security group and create a VPC endpoint for S3:
Step 4: Use AWS Database Migration Service (DMS)
Please refer to the following guide on how to configure an IAM Role for AWS DMS:
Instructions for Setting Up a Replication Instance:
Here are the steps for creating source and target endpoints:
To initiate a migration task:
Endpoint connectivity: Test both endpoints before migration to ensure Postgres and Aurora MySQL are accessible from the DMS instance.
Step 5: Set up S3 Buckets with Appropriate IAM Roles
The following guide will help you set up S3 buckets with the appropriate IAM roles:
Permissions: Ensure both buckets have the proper IAM roles and bucket policies so AWS Glue and Athena can write to and read from these buckets.
Step 6: Initiate AWS Glue for ETL
Let’s build a metadata repository, create a crawler to catalog AML transaction data, and configure an ETL Job for dataset Processing:
Glue Crawler Connectivity: Ensure the JDBC connection has the right security group and access permissions.
Step 7: Utilize Amazon Athena for Queries
Athena Spark could be used for larger datasets to enhance performance and scalability. To configure an Athena workgroup and query AML data using the Trino engine, follow the guide below:
Here are five SQL queries for Amazon Athena that AML analysts can use to gain actionable insights into transaction data. Each query targets specific risk areas, providing a streamlined starting point for further analysis.
SELECT * FROM "etl-output-bucket"."aml_transactions" WHERE Is_laundering = 1;
SELECT * FROM "etl-output-bucket"."aml_transactions" WHERE Amount > 10000;
SELECT * FROM "etl-output-bucket"."aml_transactions"
WHERE Sender_bank_location IN ('Mexico', 'Turkey', 'Morocco', 'UAE')
   OR Receiver_bank_location IN ('Mexico', 'Turkey', 'Morocco', 'UAE');
SELECT Sender_account, COUNT(*) AS transaction_count
FROM "etl-output-bucket"."aml_transactions"
GROUP BY Sender_account
HAVING COUNT(*) > 3;
SELECT Receiver_account, COUNT(*) AS transaction_count
FROM "etl-output-bucket"."aml_transactions"
GROUP BY Receiver_account
HAVING COUNT(*) > 3;
Schema Issues: Ensure that the table schema in Glue Data Catalog is correctly defined, especially after the ETL process.
With Amazon Athena now providing AML analysts with direct access to transaction data, they can run ad-hoc queries on the AML dataset stored in Amazon S3. This setup enables analysts to efficiently analyze transaction records without imposing additional load on the primary OLTP database, ensuring uninterrupted operational performance. By leveraging Athena’s serverless architecture with the AWS Glue Data Catalog, analysts can execute queries with minimal latency, gain timely insights, and meet regulatory compliance requirements without the overhead of traditional database management.
6. Key Takeaways
This project offers valuable insights into integrating cloud-based data engineering tools for AML compliance. By using AWS services like Aurora MySQL, DMS, Glue, S3, and Athena, I was able to design a cost-effective, reproducible pipeline that prioritizes both security and performance. Here are some essential lessons from the experience:
Efficient Cost Management: Small misconfigurations can lead to unexpected costs, especially with pay-as-you-go services. Monitoring services closely and understanding cost allocation is essential for optimizing budget efficiency.
Focus on Security: Establishing strict access controls, including least-privilege principles and secure network configurations, was a priority throughout. Configuring the VPC and security groups helped prevent unauthorized access, safeguarding sensitive financial data.
Adaptability of AWS Glue for ETL: AWS Glue provided a scalable ETL solution with extensive support for partitioning and schema management, crucial for handling large transaction datasets. Being aware of Glue’s configuration nuances can save time and resources.
Simplicity with Amazon Athena for Queries: With Athena, complex queries on large datasets become manageable, allowing AML analysts to extract valuable insights on high-risk transactions without impacting transactional databases. This separation of reporting and operational databases enhances overall system performance.
7. Thank You for Reading!
Thank you for taking the time to explore this project. I hope you found it insightful and helpful. Your support and engagement mean a lot to me, and I’m grateful for the opportunity to share this journey with you. Please feel free to leave your thoughts, questions, or suggestions in the comments; I would love to hear from you and continue the conversation. Stay curious, and happy coding!
8. References
- Enhancing Anti-Money Laundering: Development of a Synthetic Transaction Monitoring Dataset: https://ieeexplore.ieee.org/document/10356193
- Anti Money Laundering Transaction Data (SAML-D): Anti Money Laundering Transaction Data (SAML-D)
- AWS Skill Builder: https://explore.skillbuilder.aws/learn
- AWS Builder Labs: https://aws.amazon.com/training/digital/aws-builder-labs/